Baba Yaga Music Home »   Encyclopedic Dictionary »   Costume Index »   Many-Colored-Land »

[ Keep up with new discoveries with a free subscription to the Baba Yaga Newsletter. ]

A Square Skirt is a Circle

Square Skirt Pattern

Here is a variation on a handkerchief skirt that produces a skirt with a ruffled 20-yard hem, perfect for real skirt dancing.

The 20-yard Skirt does a Karshilama... and....The Skirt practices kicks, turns and skirt swirls!
The Skirt does a gypsy drum solo ... and ... The Skirt reveals its lyrical-yet-kinetic side!

I designed this skirt for Ruric when she went to Folk Tours camp in PA in 2007. She wanted a skirt that would really move; I wanted something more kinetic than the 'average' 20-yard skirt. We both got what we wanted.

To start out, you will need 15 yards of 52" fabric for the skirt. If you intend to add a bias trim on the bottom, you'll need another 2 yards. If you are shorter than Ruric (who is close to 6 foot tall) then you can probably get away with 45" fabric. You can always add a trim to the bottom of the skirt if you need to lengthen it. In any event, this is a LOT of fabric. If you are planning on using an elastic waistband on this, you need to use the lighter-weight fabrics in order to keep it from being too heavy to stay up! Before you launch into this project, try making a very small version out of scrap fabric, following the diagrams below. It will help a lot with the non-intuitive parts.
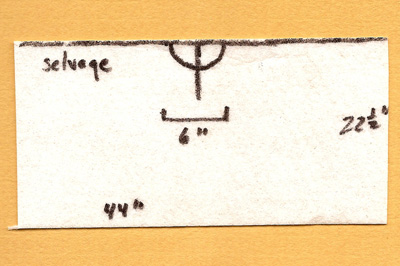
  1. Prepare 4 top pieces, each 44" long and 22.5 inches deep. I recommend that you have one long end of each piece on the selvage. This will not only eliminate the need to finish that seam, but it will identify the edges that will be sewn together later on.
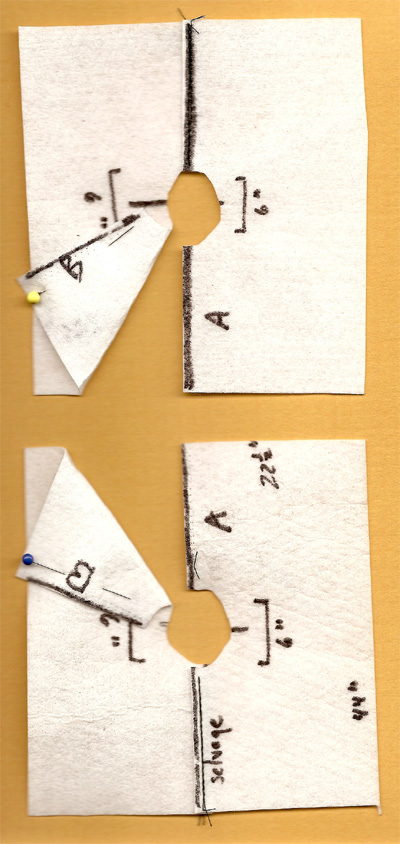
  2. Fold the pieces in half to find the center of the long selvage edge and iron the fold. (This is now a handy reference mark for construction).
  3. Cut a hole for the waist at the center of the long selvage edge. Make it large enough to get it over your hips or bust easily. Since circumference = pi * diameter, and pi is a bit more than 3, I simply say "The total diameter of waist circles = 1/3 the hip measurement." If we were making a circle skirt, we'd need a circle with a diameter of 12" for the average hip (34 - 38 inches). In this case, we are making the equivalent of a 2-circle skirt so the diameter of the circle is six inches. Make it easy on yourself and create a cardboard circle with the correct diameter, fold it in half, and use it as a pattern for the waist opening, as illustrated.
cut four top pieces 44 inches long and 22.5 inches deep.
Sew pairs of the top pieces together to form two squares. See where I have an A and a B marked on the unsewn selvages of each square? Mark them on your pieces also. Unless a big A and a big B are part of your design plan, you can settle for one safety pin along the A sides and two safety pins along the B sides. Create two squares.
Sew the squares together to create the uniquely indescribable two-square skirt. Since it cannot be described, study diagram closely. See how the A sides are sewn to each other and the B sides are sewn to each other? If I pulled the pins out of the sides of that little demo model, all the squares would spring up into beautiful 3-D (or even 4-D, for all I know) shapes that are absolutely maddeningly unwilling to help you figure out what seams to join to what. Use your safety pin marking guides and DO try to make sure that you are not sewing hem edges to waist edges with a twist in the middle!! Join two squares at selvage edges..
Decide what to do about the corners. If you leave them square, you may have to miter the ruffle to make it look good. I choose to round the corners a bit (use a dessert dish or large cup, whatever) so that ruffle can be sewn on without mitering or any other adjustments. The reason we round the corners NOW instead of earlier is because it can be tricky to predict what is actually going to BE a corner until you get this far.

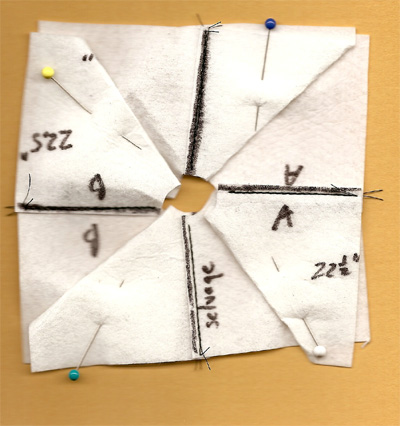
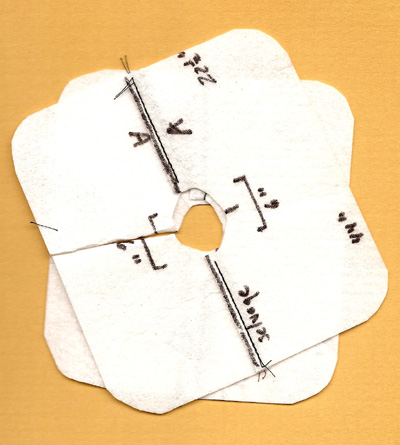
You should have eight corners in this skirt now, rounded or not.
Round corners if desired.
To avoid dimensional dementia, the diagrams will now show parts of The Skirt, not the whole 4-dimensional thing.
  1. Create your ruffle strips. I recommend a 2x gather (ruffle twice as long as the edge it is being applied to) or slightly less (1.75x). You have eight edges of 45" each on this skirt (total 360 inches) so you'll need 720 inches (20 yards) of ruffle, more or less.
    • Fast way for 52" fabric: Rip 24"-wide strips from 12 yards of 52" fabric, with a selvage down one long edge of each ruffle strip. (This will leave a long strip several inches wide from the middle of the yardage for other projects, or for the waistband casing.)
    • Fast way for 45" fabric and normal-sized woman: 22.5" wide strips should work fine, so go ahead and rip as per above.
    • Fast way for 45" fabric and tall woman: rip 16 pieces of the width you need, selvage to selvage.
  2. Gather the strips (along the selvage edge, if you followed ). I like to be able to control the gathers closely (for a better look) so I will run two or three basting seams by machine along the edges and then pull them to fit. Others use one basting seam, or they zig zag over a string and pull it up... whatever you prefer.
  3. Apply the gathered ruffle. If you have trouble controlling this process, then lay the blankety-blank skirt on a large flat surface and hand-baste the ruffle to the skirt before machine sewing them together. Sometimes hand basting takes less time (and is certainly less stressful!) than dealing with hundreds of pins and ornery slippery skirt pieces at the sewing machine.
  4. Apply the waistband casing (green mark around waist in diagram). Unless you made this skirt out of spider web, you'll need a 1.5" (or more) wide elastic to hold it up, which means a 4.5-inch wide casing piece which is as long as your waist opening circumference. Run a reasonable amount of elastic through the casing and fasten loosely with a pin. Adding the casing now means that the skirt will not slide out of the skirt hanger because of its weight during the next step. It also leaves you 100-percent-ready for a skirt fitting.
Add Ruffles.
You are now ready to hang, mark, cut, sew and press your hem. I have placed detailed instructions for these tasks on the Hems page on this site, since making a hem is a task common to most garments. PS - what does the blue edge on the bottom of the ruffle diagram mean? That is the part that will be cut away when you fit your skirt, since the square corners become the points on the skirt that are closer to the floor.

BabaYagaMusic.com
Maura Enright, Proprietor
Author:
©2013 by Maura Enright
© means the content is copyrighted. Your links to this content are much appreciated.
maura@babayagamusic.com