Baba Yaga Music Home
» Encyclopedic Dictionary
» Costume Index
» Many-Colored-Land
»
[ Keep up with new discoveries with a free subscription to the Baba Yaga Newsletter. ]
Make a Shrug for Dance or Street Wear
Shrugs add warmth, modesty, texture and color to your costume.
- Instant Shrug from harem pants.
- No-Sew Tribal Shrug from a pair of tights.
- Quick-sew Shrug from a knit.
- Triangular Shrug: no-sew or quick-sew.
- Bling on a String gathered shrug.
Instant Shrug
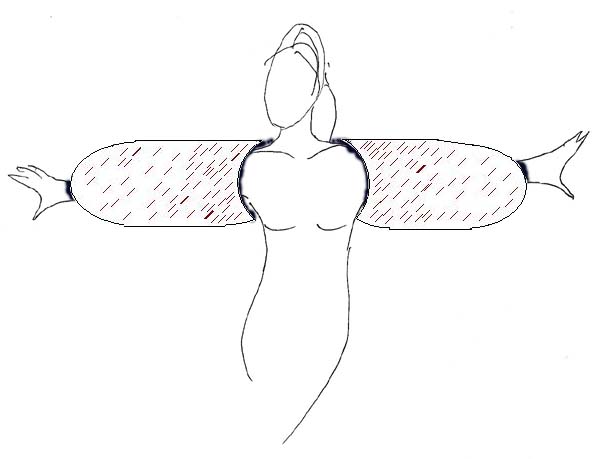
A pair of harem pants with elastic at waist and ankles can be turned into an instant shrug.
- Position the elasticized waist opening at your back and facing your body.
- Push an arm in through the waist, down one leg and out an ankle opening.
- If necessary to keep the back in position, use a safety pin or two to attach it to your dance top.
In the illustration at the right, the black fuzzy lines mark the position of the pants elastic on the dancer body.
|
 |
No-Sew Tribal Shrug
You can make a shrug from any pair of tights or pantyhose that have a crotch insert that can be cut out. These are favored by tribal dancers, and patterned black or white ones are frequently underneath tribal bras to provide a choli-look without a choli.
These shrugs may not last more than a few wearings. Cut carefully, put on and off gently, and store in a little sack to prevent catching and fraying.
- Crotch inserts used to be standard on tights and pantyhose, providing ventilation and ease. These days the cheaper versions may omit them, which means it will be more difficult for you to convert them into a shrug. The crotch insert seams provide reinforced seams that allow you to remove the 'neckline' without runs developing.
- If you absolutely must use a pair without a crotch insert, then try gently removing the stitching that holds the legs together at the crotch and see if this works.
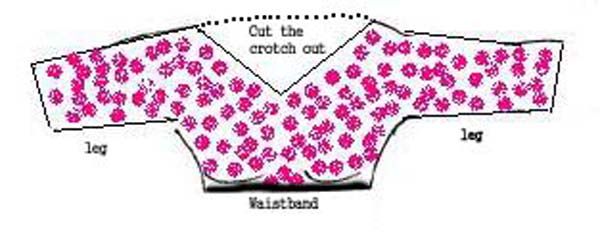
- Lay the tights or pantyhose on the table and carefully remove the crotch insert in the center, staying INSIDE the seam lines so that all the seam stays on the shrug piece.
- Cut off the legs at the ankle.
|
|
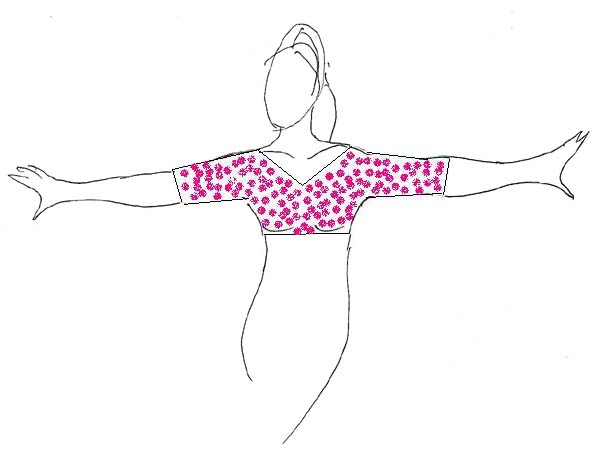
- Carefully ease the garment on over your head through the waist opening. Head goes through the new opening you cut away and arms go down the legs.
- If shorter sleeves are desired, try easing the fabric up your arms. If still too long, cut.
|
|
Quick-Sew Shrug
You can make a shrug from almost any fabric, but a knitted stretch fabric that does not fray easily is the fastest because all you usually HAVE to do is sew two underarm seams: the edges will curl under and stay out of sight.
If you want to use a woven fabric, you will probably have to cut the shrug a little wider and add a narrow elasticized casing at the center opening and the cuffs to give it a bit of fit while you move.
Do a quick test drive by cutting a piece of scrap fabric (24 inches long and 45 inches wide). Sew the underarm seams (as below) and try it on to make sure you have the shape you want; now is the time to decide you need wider sleeves, shorter sleeves, a larger opening behind the torso, etc.
- Cut your fabric. I find a piece of stretch fabric about 24 inches long (2 feet) and 40 - 45 inches wide (selvage to selvage) works well to start out with. Not skin-tight or hanging sleeves.
- Stitch the bottom seams (the dashed lines in the picture to the right) leaving enough opening to span the dancer back (16 - 18 inches, more or less. This is why you need a test drive!).
- Be sure to backstitch at both ends so the stitching doesn't unravel.
- If desired, finish the edge of the torso opening.
- If the fabric is woven and will fray, you need to finish this edge for sure.
- If the fabric is knit but you will use it a lot, finish it with a hem suitable for knitted fabric so it will retain shape.
- If you cut your fabric from selvage to selvage, and you like the look and the length, you do not need to finish the wrist openings. Otherwise, hem or bind.
|

|
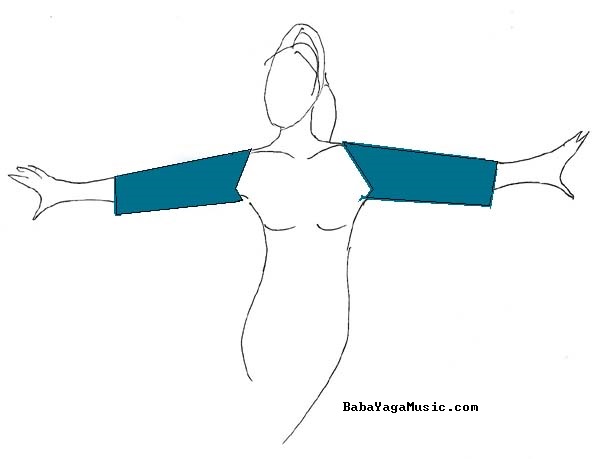
- Turn the shrug inside out.
- Position the torso opening at your back and facing your body.
- Push an arm in through the torso opening and down to a wrist opening.
- If necessary to keep the back in position, use a safety pin or two to attach it to your dance top. OR - dye a piece of narrow elastic with tea and pin it across the opening at the chest to hold it in place.
|
|
Triangular Shrug
During my Jan 2013 shrug workshop, I used an embroidered Indian veil (dupatta), 80 x 40 inches, as the fabric. It created a luxuriously draping shrug with small cuffs that hit above the wrist: perfect for some dances and a nuisance in others.
90 x 25 will yield a luxurious shrug with large cuff openings and wrist-length sleeves.
If you want a smaller, less dramatic shrug, reduce the width (to bring it higher on your back) and the length (to make the sleeves shorter). Test your altered pattern with a rectangle of fabric which you pin (not cut!) to the desired dimensions before pinning the shrug together.
This shrug will usually not lay flat; the sleeves will often pull the side back up and the cuffs will not be exactly at the end points. This is NOT a bad thing; it makes the shrug 3-dimensional, like your body. If you need to tweak the length or the width of the fabric base, you can simply adjust your pins.
- If you are using cut fabric, hem it all around.
- If you plan to ornament or reinforce the shrug fabric, apply the ornaments and reinforcement.
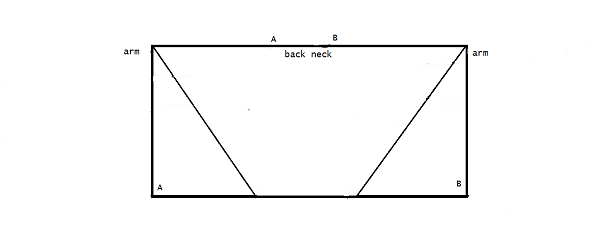
- Insert a safety pin at center back.
- Mark the sides of the back neck opening (5 - 9 inches) with safety pins. One-half of the desired opening is on either side of center back, leaving the center-back pin exactly in the center of the neck opening.
- Fold the bottom corners up to the edge of the neck opening: A to A, B to B.
|
|
|
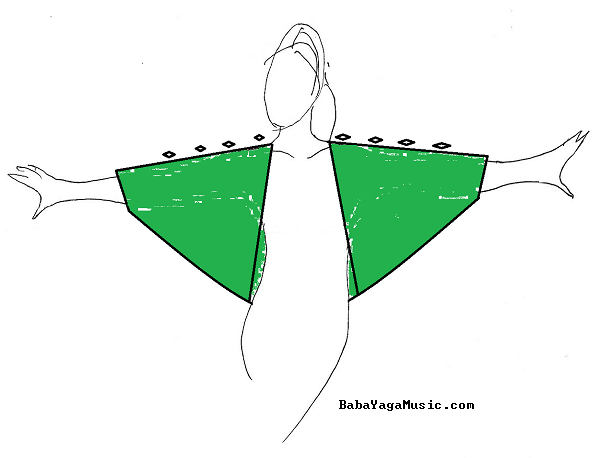
You can pin this shrug into shape by discreetly inserting small safety pins at the diamond points. If you want to make sure it stays on no matter what you do, pin the shrug to your underlying costume at back neck and/or shoulders.
However, if you can sew a straight seam, I recommend sewing it into shape instead of pinning it. You may need to stop the stitching short of the cuff ends in order to allow room for your arms to get out; this will depend on the dimensions of your fabric.
In the workshop, I demonstrated a dozen enhancements that add to the durability and beauty of this shrug. The three most important are:
- Fabric facing at the neck opening to minimize wear and tear;
- Elastic casing at the cuff ends (cutting the tips of the fabric off if necessary);
- Ties attached in the front.
|
|
Bling-on-a-String Gathered Shrug
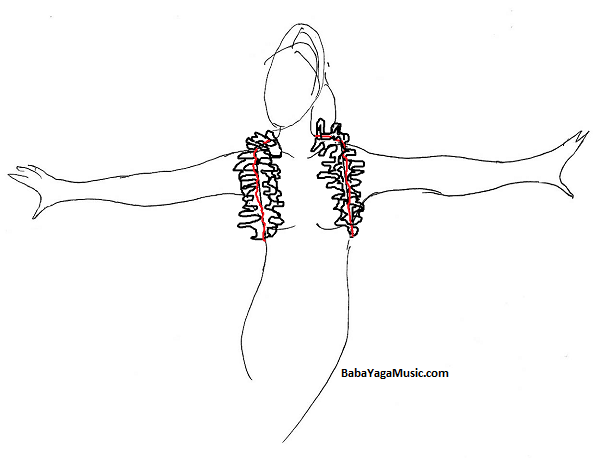
This shrug is composed of long narrow pieces of fabric or lace which are gathered and then stitched to a ribbon. The center of the shrug is placed at center back neck, then the ends come forward over the shoulder and down in front of the arms. The gathered fabric stops at the bottom arms; the ribbon continues under the arms and to the back, where it is tied.
I call this shrug Bling-on-a-String because it can be heavily ornamented and is worn around the neck and chest, like jewelry.
If you don't want to hem this item, then use a fabric that does not fray. At the Jan 2013 workshop I showed a sample made of bridal illusion (a soft tulle).
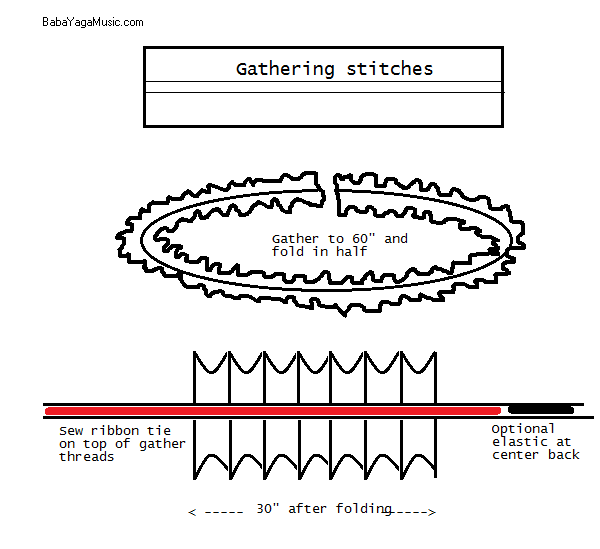
The Jan 2013 workshop sample was made from 5 strips of illusion, each 10 inches wide and 45 inches long, for a total of 6 yards long. These strips were then gathered up to a length of 60 inches, then doubled up and stitched to a ribbon 2 yards long.
Customizing the shrug length: A larger woman might want a longer gathered length, a smaller one a shorter length. In this case, your tape measure is your friend! Run the tape from the front of one armpit, up the chest, around the back of the neck, forward to the chest and down to the front of the opposite armpit. Double this length; This will be the length of your gathered strips. The shrug is folded in half after gathering and then stitched to a tying ribbon.
|
The length of the ungathered fabric will depend on the fabric and the effect desired. The bridal illusion used in the workshop could have been made much denser if a more otherworldly or regal look was desired. A thickly-woven lace might look best with less gathering. Testing with a small sample is wise; take 12 inches of your proposed fabric and gather it. Does it look best at a 2:1 ratio? (12 inches of strip gathered to 6 inches long.) 3:1? 6:1?
Prepare the long strip to be gathered:
- If the fabric will require hemming, do so now.
- If you want to use ornaments that are easiest to apply while the fabric is flat (like ribbons or binding), apply now.
- Sew strips together into one long length.
- Run two rows of gathering stitches (the longest stitch on sewing machine, or hand stitches) down the middle of the long length, about the width of the ribbon that will be used to secure it.
- Fold the long strip into quarters and mark each quarter with a safety pin on the edge.
Gather and size the long strip:
- Pulling gently on both gathering threads, gather the strip to 60 inches long (or to your custom length, as determined above). Make the gathers as even as possible.
- Fold the gathered shrug at the 1/4 and 3/4 mark pins, meeting in back at the 1/2 mark pins.
- Hand-flatten the gathered strips and pin the typing ribbon along the gathering seams, centering the ribbon at the 1/2 mark pin.
- Stitch the ribbon to the gathered strips. You will have about 18 inches of ribbon left on each end.
|
|
|
In the 2013 workshop we discussed several fitting options, including:
- Vest over shrug
- Adding a bit of elastic to the end of the tie and stitching the back closed instead of tying it.
|
|
BabaYagaMusic.com
Maura Enright, Proprietor
Author: Maura Enright
©2013 by Maura Enright
© means the content is copyrighted. Your links to this content are much appreciated.
maura@babayagamusic.com


